Category Archives: makeup

mad men mouth

So if you are like the thousands of other Americans obsessing over the fabulous TV show Mad Men, then you have probably tried to pull off the red-lip-look.

Finding the perfect red lipstick is like trying to find the perfect man nearly impossible. I have tried more red lipsticks than I can count and have four options that I believe can fit almost every woman.

These four lipsticks are all by Revlonyup, about $6 each.

(left to right)RED REVIVAL (645) color sensational, REALLY RED (006) matte, RED REVOLUTION (630) color sensational, FIRE & ICE (720) super lustrous

20120305-060729.jpg

20120305-060742.jpg

20120305-060747.jpg

For Dark Skin – Stick with a deeper red, close to a brick color. I am loving Revlon’s RED REVIVAL (first one on the left).

For Every Girl – MAC lipstick in RUBY WOO is the one lipstick that is always compared to the Mad Men show. A cheaper alternative and very close match is Revlon’s REALLY RED (second from the left). This is a matte color that looks just like the colors used on the show – its not shiny but its also not drying – one of my favorites and looks GREAT on almost everyone!

For Medium Skin – Choose a pinkish red, close to a cranberry color. A great option is Revlon’s RED REVOLUTION (third one from the left).

For Fair Skin – If you are like me, fair skinned gals need to lean more towards reds with corals. A must have is Revlon’s FIRE & ICE (on the far right).


bobbi brown vs revlon

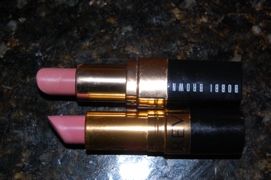
I have been using Bobbi Brown’s PALE MAUVE (73) lipstick and have been obsessing over it. It is the perfect color for daytime, meeting the parents, job interviews or shopping with the girls. I love the color – but I am not crazy about the price… $23.

It is a nice nudey-pinky color that is perfect for the upcoming SPRING season. This Spring is going to be all about NEON colors… so if you are rocking some hot pink and orange, make sure that your lipstick is not competing with your fit. Bright lips are all the rage right now but if you pair that with a loud outfit you might just look like a Crayon-box explosion… so remember this golden rule: Neons + Nudes.

I found an amazing dupe to Bobbi Brown’s PALE MAUVE by Revlon – PRIM ROSE (668) in the super lustrous lipstick line.

These two colors are undeniably indistinguishable. I literally cannot tell which is which… So why not go with the Revlon option for only $6?

20120302-104257.jpg

20120302-104317.jpg

This Spring its all about the bright neon colors… Don’t let your makeup compete for attention with your outfit and go with this nude lip!


pink pout

I LOVE LOVE LOVE lipstick right now… from bright colors to nude, all are great for Spring! Again, love some lipsticks but hate paying massive amounts! MAC has the recycle program where you can bring in six empty MAC containers and you can get a free lipstick of your choice!

Don’t have any empty containers and don’t want to pay $15? Well some of the most cherished colors of the season can be found for much less. Revlon has amazing lipsticks and they can be found for around $6!

Better yet, if you watch the coupons that come out on Sundays, you can find some places that have a ‘buy one, get one half off’ deal!

20120305-061206.jpg

20120305-061230.jpg

A go-to that I have been rocking lately is MAC’s SHOW ORCHID (A61). It is a super fabulous color that is bright and will jazz up any outfit. A great alternative is Revlon’s WILD ORCHID (457). These two colors are practically identical.

So splurge on a $6 tube today and bring some color into your life!


erase the streaks

It is almost Spring (well sort of!) and we all know what that means… Spring Break!! Yes, in my other life I am a college professor and I get a sPrInG bReAk! It is ok to be jealous of my whole week off 🙂

It is around this time that I start to slather on the ole’ tanning lotions in preparation for shorts, skirts and the dreaded bikini. (See earlier post about tanning lotions to see which ones I prefer.)

No one is perfect – and neither is the tanning lotion. We can make some mistakes which result in streaking, dark knuckles and uneven tones. It can be a nightmare waiting for the color to rub off or to fade… I have tried (literally) everything in the book – from scrubbing my skin raw, to applying baking soda, soaking in lemon juice and even rubbing alcohol. Please, for the love of your skin, do not try any of these! Not only were they ineffective, but they hurt!

I have (with the help of my lovely cousin Jules) discovered a much easier and softer way to remove any unwanted self-tanning streaks, lines, or globs.

20120221-093319.jpg

Simply use a Magic Eraser by Mr. Clean. You have seen the commercials… if it can remove grease and crayon and permeanat marker – why not self-tanner? Simply wet the Magic Eraser and then squeeze as much of the water out as possible. LIGHTLY rub on your skin and watch the color come right offAMAZING! Avoid your face but this is perfect for knuckles, knees and feet.

Enjoy a perfectly tanned Spring Break!


loud lips

This weekend I was hanging out with Hanna and the girl has some rockin’ style. She is never afraid to push the envelope… so when I saw her in some insanely bright lipstick, I didn’t even bat an eye. The loud lips she was sporting got compliments all night long… and before the night was over I had on the lipstick too!

Wouldn’t ya know it… the next day Beej sees me in the color and decides that she just loves it too! Basically we are all obsessed with this color and couldn’t love it more.

20111025-100957.jpg20111025-101231.jpg

The color is by MAC and is called FUSION PINK – its is incredible. One swipe on the lips and it will last hours.The other best thing about it? It looks great on most skin tones and jazzes up your makeup for fall!


sunless tanning

Once  upon a time, I would regularly visit the tanning bed (gasp). I couldn’t help myself – I loved having a little color to my skin. You see, when I was a wee one I had strawberry-blonde hair and we all know how redheads tan – we don’t. We freckle and burn, only to become ghostly white once again.

So  when I discovered the magic of the tanning bed and how you could SLOWLY but surely build a tan, I was all over it.  Only it wasn’t so great… My skin started to look leathery and my freckles tripled. I love the freckles but leathery skin? I think not…

So I hit up the NEXT best thing – the spray tan. Back in the dark ages they had something called the Mystic Tan – and I was addicted. A few sprays in a booth and viola! Instant tan. However, looking back over some photos I realized I looked more like the ‘great pumpkin.Orange and me do not mix. Exhibit A to the left…

Next up was the Versa Spa – the newest thing in sunless tanning. I LOVED it. I would hit it up once a week and would order up the ‘dark tinted’ mixture to be saturated with. I love this and still do – but it’s costly. Exhibit B to the right…

Being on a budget meant that the weekly spray tan I wanted so much couldn’t happen as often as I would like… so I considered the infamously BAD tanning lotions. I tried many, many kinds and brands but my all time favorite? Loreal Sublime Bronze. Its AMAZING. Seriously. I do not even hit up the spray tans any more – just slap on a little of this and I’m ready for a night out!

It is tinted so that you can see exactly where you have put it and if there will be streaks or not. I like the medium color and prefer the gel instead of the lotion – but both work well. It dries quickly and gives you a little extra color right out of the gate. After a few hours on the skin you have a beautiful, natural-looking tan! It’s about $10 a bottle but the bottle will last me over a month – sometimes two.

20111012-090744.jpg

So in summary – its cheaper than the spray, healthier than the beds, and overall looks better… And you don’t even have to leave the comfort of your own home!

Tips: wash your hands afterward, exfoliate the bod before application, shave the gams so that the lotion/ gel can spread evenly and smoothly, put lotion on your elbows and knees and ankles before application. (I prefer to do it at night so that I can wake up with a tan, wash off the lotion, and be set for the day.)

Happy Tanning!


the daily grind

Some of you have asked me about my ‘daily grind’ in regards to my skin care – so I thought I would share the products and tools I use on a daily basis that I cannot live without.

You know the question – “If you were on a deserted island, what would you HAVE to have?” Well the following things would be on the top of that list! I have tried multiple facial products but these seem to be the best for me (and maybe you!).

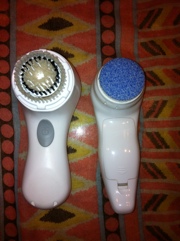
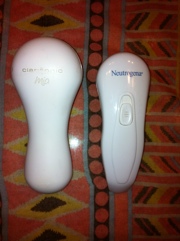
Below are my facial brushes. The one pictured on the left is the MIA by Clarisonic. I LOVE this brush. It doesn’t spin around and around, but slightly twists and vibrates. It is pretty pricey ($120) but in my opinion totally worth it. I feel like my face is super clean but not stripped of the natural oils. I got the ‘sensitive skin’ brush which is softer than the original. My lotions and creams really seem to absorb into the skin more when I use the brush. I use the AVEDA sensitive skin facial cleanser with it.

20110925-013717.jpg

The brush on the right is by Neutrogena and was what I used everyday before I purchased the MIA. This brush is a great cheaper alternative. I recently saw it in stores for around $20. It is great but now that I have the MIA I don’t use it as much. This brush vibrates and the pad has the face wash built in – and the pad is rough and is great for exfoliating. I use this one still about once or twice a week to get the dead skin off.

20110925-013756.jpg

My ALL TIME favorite lotion is StriVectin-SD. Now… this is suppose to be used as stretch mark remover or diminisher but it is AWESOME for my skin. I use this at night as a lotion (on my face and neck). It is thick – but doesn’t clog my pores. It also has a peppermint smell and tingles when you apply it. I seriously LOVE this. I get mine at Sephora – pricey but one jug will last you at least a year and a half… a little of this stuff goes a long way. In the morning I use the AVEDA sensitive skin lotion under my makeup.

20110925-013831.jpg

For an astringent I have found and fallen in love with THAYERS Witch Hazel. It does not have alcohol in it – therefore it does not strip your face of the natural oils. It is super cheap ($10 for a HUGE bottle) and can be purchased at Whole Foods. The product comes in different scents and with different added things for different needs. I prefer the Rose Petal with Aloe Vera. This can be used to remove that last bit of makeup, including eye makeup. I wear contacts and this has never bothered my eyes. LOVE <3.

20110925-013857.jpg

The last thing I do before my beauty sleep is lip service and eye care. I have lips that will get chapped CONSTANTLY so this new-found favorite is a must on my nightstand! Neosporin Lip Health, which can be found in any grocery store, is amazing – a must have with the cold weather moving in. It is an overnight renewal therapy that works while you sleep. It is creamy but the lips really absorb it. I would not recommend this during the day as it makes the lips appear whitish. The eye cream I use is the Aveda Green Science firming eye cream. I have used this for about six months – and the jug is still half full. I really can tell a difference too – my fine lines are not as prominent and it tingles when you apply it!

20110925-013906.jpg

Hope you enjoy and ‘grind on!’


brush it on

So… I get really annoyed when the sales people at the makeup counter try to sell me at least 3 eyeshadows and 5 brushes. How about a great eye with one shadow and one brush? I mean… I am a girl on a budget.

Well after being fooled into buying multiple eyeshadows at a time (and then really ever wearing just one color) I figured out a way to apply the one color in a great looking way.

I take one brush, press it into the eyeshadow (shown here in CAMEL by Bobbi Brown) and press the color onto the lid (toward the lash line) – do not rub. I really like the color to be intense so I really pack it on.

Then I simply shake out the brush and pull the color up. I do not apply more shadow to the brush – just blend the color on the lid up towards the crease (more towards the outter edges) and a little beyond (NOT up to the brow). Sometimes – when I’m feeling a little crazy – I will take the brush and sweep it once under my eyes to up the intensity level a bit.

20110917-120019.jpg

I also want to show you my three favorite brushes… The only three you could ever need for shadow. I got these from Target a lifetime ago but they have held up beautifully. They are by Sonia Kashuk and are VERY reasonably priced. They also have some in travel kits so you can get mulitple brushes for a lower price. I bought mine in white but wouldn’t  again… the handles show any makeup you may have on your fingers – FYI.

20110921-111132.jpg

The middle brush was used to do the look shown above. It is the brush I use the most. It is really the ONLY brush I need.

The top brush is one that I use when I want a lighter, everyday look. It applys the color all over the lid (and I can still use the CAMEL eyeshadow!).

The bottom brush is one that I mainly use for a night time look. I put a darker color (Bobbi Brown COCOA) on the brush and apply it just to the crease. I dip the brush and pull it back and forth through the fold in my lid. Very easy and pretty much fool proof!

Coming up later this week: Mascara on the ChEaP and extreme eyeliner.

Brush on!


foundation first

Putting down a good foundation is essential when building anything – including your face.

Below are my favorites of all time plus some newly discovered faves. They are all good for different times and activities.

The MAC face and body foundation is great if I want light coverage but need it to last a long time. I got sick of the ‘long-lasting’ stuff feeling like a mask… It was just so thick and goopy! This stuff is sheer and literally lasts days if you need it to! It’s perfect for working out or all day events.

The Lancome is my go to- this is my everyday wear. It is sheer but it covers- Not too thick and it is very smooth and creamy. It is moisturizing like a lotion but never looks greasy. Also has never clogged my pores… A HUGE must!

My new found faves are the two by Bobbi Brown… The makeup guru (see MAKEUP GURU post) gave me these testers and I love ’em! I’m waiting til I run out of what I have currently before purchasing these.

Listed and pictured below are the foundations and colors I use…

MAC face and body foundation in C3 A78 (on the left)
Lancome renergie lift makeup 20 SPF in Clair 20 18E 0001 (on the right)

I got this foundation brush at Target and love it!!

20110917-040815.jpg

20110917-040826.jpg

Bobbi Brown luminous moisturizing foundation in sand (on the left)
Bobbi Brown skin foundation SPF 15 in natural (on the right)


glosses & polishes

So I had a few requests… lip glosses and fingernail polishes. Well here ya go!

So first off – the lip gloss.

Chanel makes my all time favorite – “gorgeous shimmer and a high-shine glow”

Below are my faves – Colors (left to right):

144 – Rose Dilemma, 106 -Myriade, 89 – Rose Sand, 217 – Red Shine, 122- Nebula.

20110916-041917.jpg

20110916-041925.jpg

Fingernail polishes – These are my favorites from summer to winter… and they are all different shades and brands.

Below are my most used and loved – Brands and colors (left to right):

Sally Hansen – Sonic Boom : Great for summer… its a nice alternative to pink

OPI – Lincoln Park After Dark: Awesome in the dead of winter

Nina Ultra Pro – Orange Flame: MY new summer favorite… its a little obnoxious!

Sinful Colors – Dream on: Super fun and grabs attention

Chanel – Strong: More purpley than the dark OPI and more metalic

OPI – Big Apple Red: Best red out there

Sally Hansen – Cinna Snap: A Fall must have… its a deep red and it rocks

Beauty Secret – Top Coat: Super seal it! You can grab this up at Sally’s

20110916-043422.jpg